
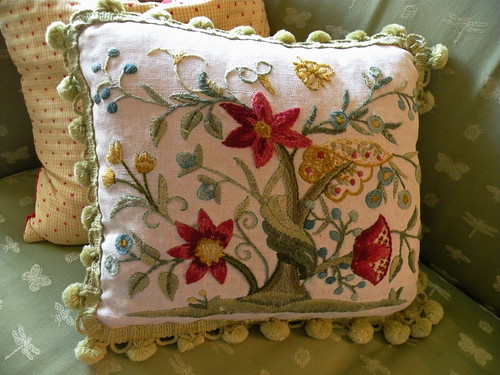
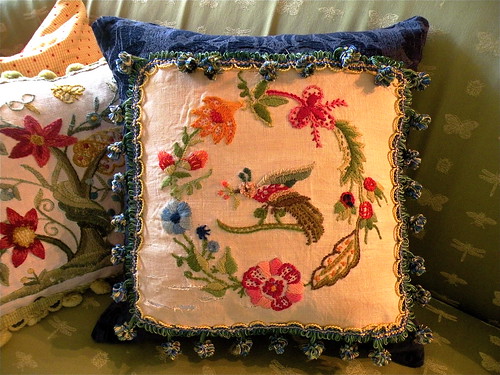
 I meant to write about this pillow a few weeks ago, but never got around to it. Mainly because when I made it, I didn't document the process. Anyway, I got a second chance and thought it would be a good DIY project to share. The pillow above (and the one below) were embroidered by my Mother about 30+ years ago. She got interested in doing embroidery for a little while and these were two completed projects, both made into pillows. They were kits that she ordered (maybe from Colonial Williamsburg) that came complete with linen, pattern, embroidery yarns and backing material. Okay, so fast forward three decades and a couple of house moves and these pillows found themselves hidden in my parents attic - dirty and falling apart. When my Dad got sick in December, he was using whatever pillows he could find to prop himself up in his chair and the one above was getting a new workout. After he passed away in January and we were cleaning things out, we almost threw out the pillow. It was flat, dirty and sad looking. (So were we, actually). Mom said to threw it out and I had it in my hand over the trash when I realized that in daylight, the pattern and workmanship was quite lovely and it could possibly be resuscitated. And, I am so glad I took that second look. Funny, because when I came walking back into Mom's house with it in my hand, she said as I walked in, maybe you should keep the pillow. I spent a lot of time making it!! Whew! I think if we'd tossed it, it would have been one of those niggling things in the back of our minds, just a little regret.
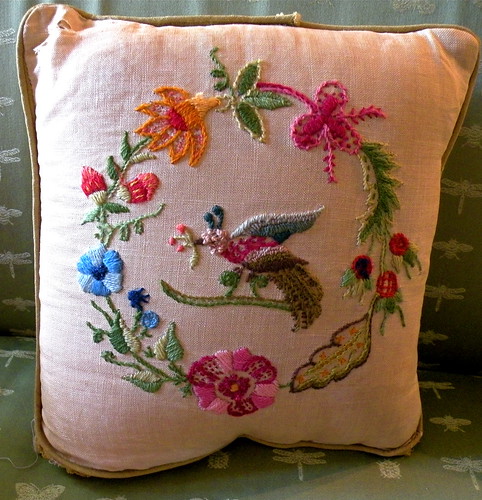
Okay, so now I have a pretty pillow, remade to match my living room - sorry Mom! Anyway, she did kind of want it, but greens don't match her house. Well, luckily, she found another one in need of a new suit of clothes! I think she must have made this one first as it's significantly less complex than the pillow up top.
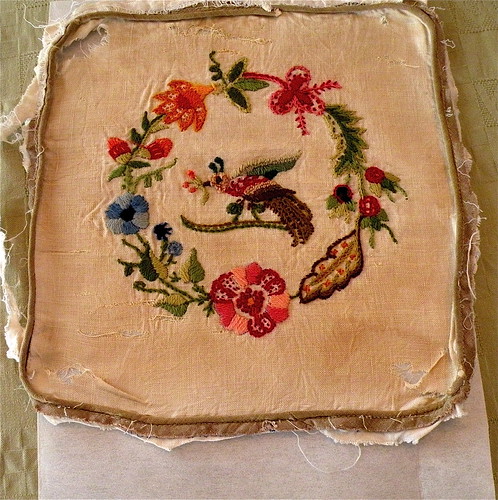
 So, here is how I resurrected these sad little embroidered pillows. First, they needed to be washed. The photo above does not do justice to how dirty this pillow really was (as was pillow #1). The photo below better shows what I was dealing with. There was also some shredding in the linen to be dealt with.
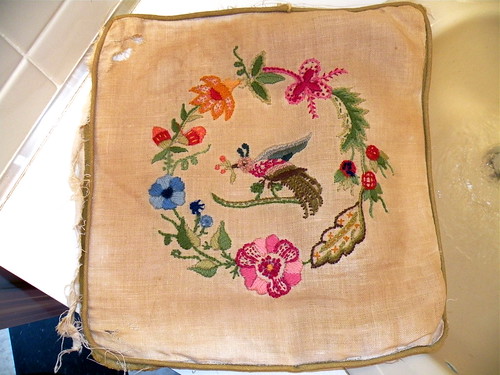 So, after removing the pillow (which was trying to break free anyway) I cut off the back, leaving the welting in order to stabilize the linen during the washing process. I used liquid laundry detergent and very hot water to get out as much dirt and dust as possible. I rinsed till the water ran clean and then submerged in a mild bleach and soap bath in hot water and let sit for a few minutes.
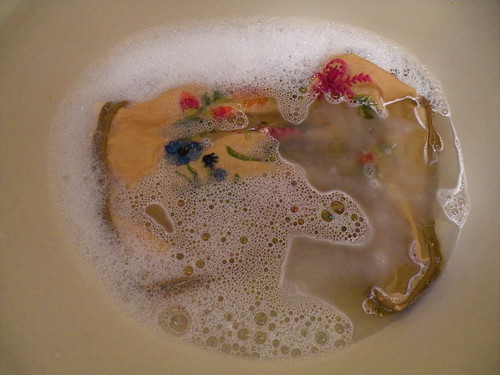 Well, okay. This one did not hold up as well as pillow #1 did. More shredding... A big side note - if these were real antiques or of great value, I would not recommend doing as I did without input from a professional textile restorer. Since these were homemade, attic finds, I felt okay just blundering along on my own.
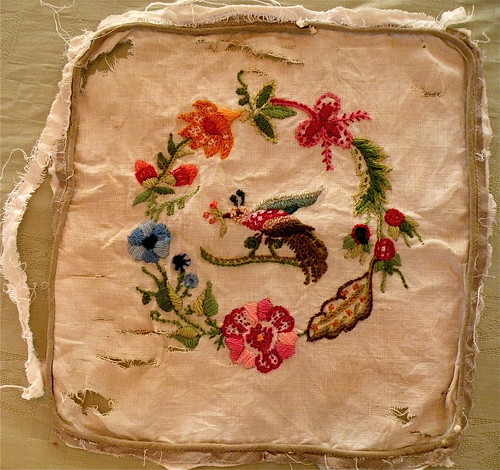
I mentioned this to Mom, who said, throw it away, that's fine. I was up for the challenge and figured that it wouldn't hurt to keep trying. The linen needed to be stabilized in order to stop shredding, so after cutting off the old welting, I adhered to a stiff iron on interfacing.
 Once that was done, I needed to find coordinating fabrics. Since I wanted to give this to my Mom (generous, I know!) I wanted it to match her decor, which tends towards blues. Normally, I would piece together the fabric border around a center image, but since this linen square was now compromised, I figured I'd just sew it on top of a fabric square, and top with an embellishment. I like to keep hold of discontinued fabric memo samples for use as pillows - so quick and easy!
Below, you will see the face fabric and trim that I'd chosen and the fabrics I was deciding between for the backside fabric.
 In the end, I went with the simple blue basketweave, which is fine - it's not about the back anyway!
And, voila - a dirty old pillow gets a new lease on life!
So, check your attic and see if you have anything that could be remade. You never know!


No comments:
Post a Comment